Using your own data (traits) to create custom segments
Want to send Web Push Notifications to segments that are created based on your own data about your clients? You can do that by using Traits and Javascript API.
Define user traits (custom fields)
1. In e.maxtraffic.com go to Settings > Website Settings > Trait mappings

2. Click on "Define new trait" button to add new user trait (custom field)

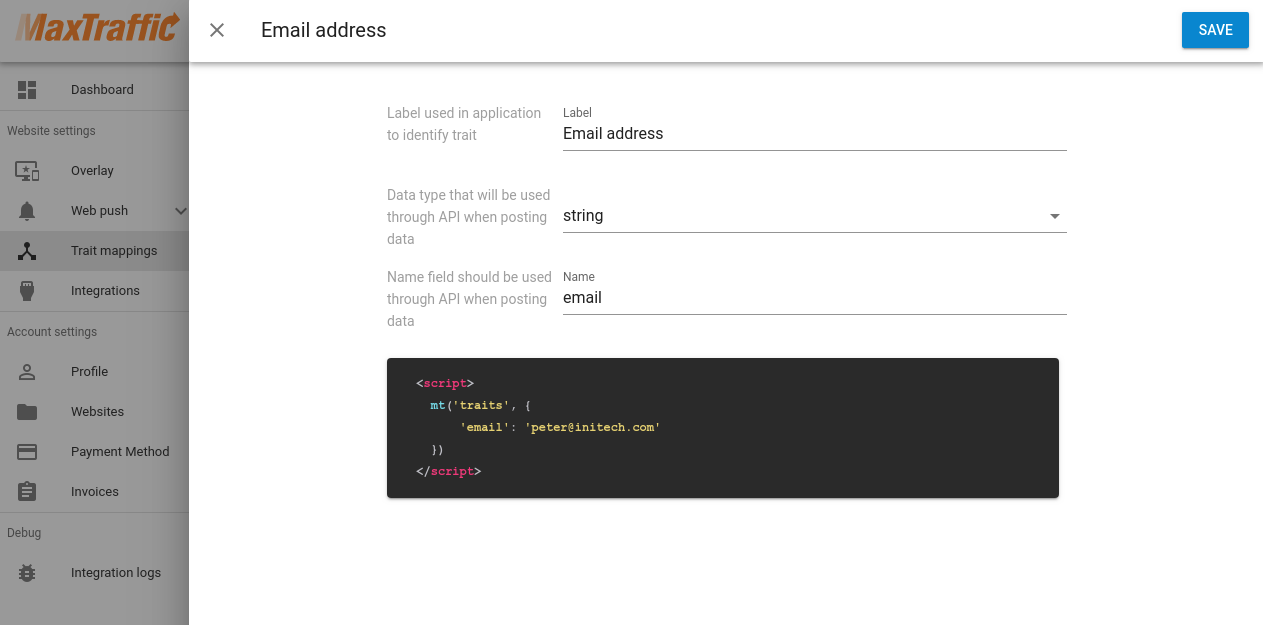
3. Fill out details about each user trait (custom field) that you want to use:

IMPORTANT: make sure to use correct data type and name field - after you have saved trait, later it will not be possible to make changes to data type or name field.
4. Click Save
Pass trait info (custom fields) to our tracking code
For our platform to receive data from your system, you will need to modify MaxTraffic tracking code. By default it looks like this:
<script>
  window.mt=window.mt||function(){(mt.q=mt.q||[]).push(arguments)};mt.l=+new Date;
  mt('create', WEBSITE_ID);
</script>
<script async src='//cdn.mxapis.com/mt.js'></script>
If you want to pass trait info (custom fields) to our platform and later use it in segments, then you need to add Javascript snippet for each trait you want to use. For example, if you want to pass email data to our platform, then you need to add following code:
<script>
  mt('traits', {
    'email': 'peter@initech.com'
  })
</script>
Note: replace peter@initech.com with actual email address of your client
So final code would look like this:
//MaxTraffic tracking code
<script>
  window.mt=window.mt||function(){(mt.q=mt.q||[]).push(arguments)};mt.l=+new Date;
  mt('create', WEBSITE_ID);
</script>
<script async src='//cdn.mxapis.com/mt.js'></script>

//Set trait, pass data about client email
<script>
  mt('traits', {
    'email': 'peter@initech.com'
  })
</script>
Note: replace peter@initech.com with actual email address of your client
IMPORTANT: if you use Google Tag Manager or similar tool, make sure that both codes (tracking code and trait code) are loaded together as one tag OR set trait code is loaded only after tracking code is initialized.
Example 1: counting number of times, when user has logged in
If you would like to create a trait that shows, how many times a client has logged in, you could do it in following way:
1. Go to Settings > Website Settings > Trait mappings, click "Define new trait"
2. Decide about the Trait name, in this example we will call it "logins":

3. After a login event occurs in your website, trigger following code:
<script>
// Increment field value by 1
mt(function(sdk) {
    var name = "logins"; // Trait name
    var value = 1; // Increment amount
    var traits = {};
    traits[name] = (sdk.visitor.traits[name] || 0) + value;
    mt("traits", traits);
});
</script>
Example 2: adding new values to Array
If you have a trait that uses "Array" as data type, and in some situation you want to add new values instead of replacing them, then you can use following code:
<script>
mt(function(sdk) {
    var name = "topics"; // Set trait name
    var values = ["topic1"]; // Set new values to append
    var traits = {};
    traits[name] = (sdk.visitor.traits[name] || [])
        .concat(values)
        .filter(function(v, i, a) { return a.indexOf(v) === i });
    mt("traits", traits);
});
</script>
Example 3: setting multiple traits with one request
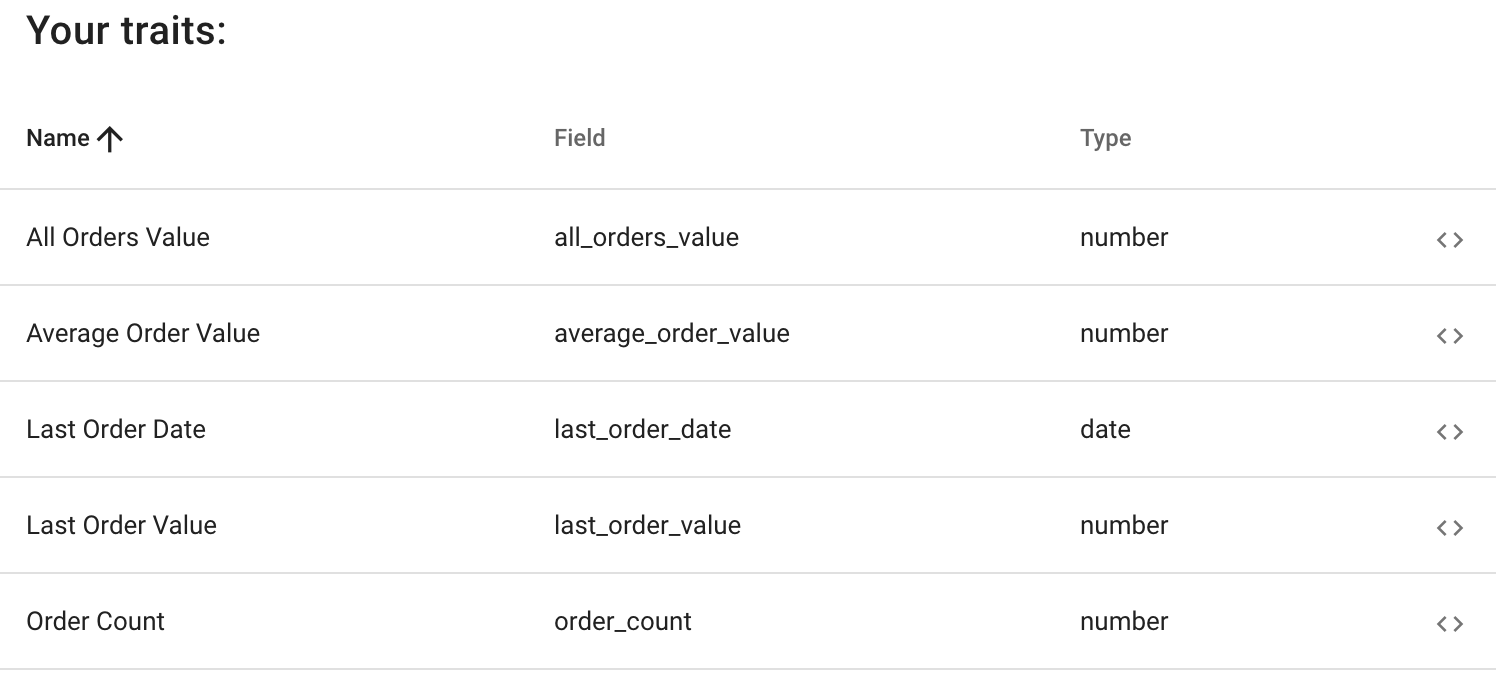
If you would like to save more detailed info about orders and later segment subscribers based on this data, you could create following traits:
- All Orders Value
- Average Order Value
- Last Order Date
- Last Order Value
- Order Count
And it would look like this:

And then - after purchase is made, in "Thank You" page (conversion page) execute following code.
Note: replace {{TotalSum}} with your own variable that contains the order value.
<script>
mt(function(sdk) {
    var orderValue = parseFloat('{{TotalSum}}');
    var lastOrderDate = (new Date()).toISOString();
    var orderCount = (sdk.visitor.traits.order_count || 0) + 1;
    var allOrdersValue = (sdk.visitor.traits.all_orders_value || 0) + orderValue;
    var averageOrderValue = (allOrdersValue / orderCount);
    mt("traits", {
        last_order_value: orderValue,
        last_order_date: lastOrderDate,
        order_count: orderCount,
        all_orders_value: allOrdersValue,
        average_order_value: averageOrderValue,
    });
});
</script>